v1.6-v1.7 How to edit favicon

jaime042

New member
XNullUser
Joined
Sep 26, 2021
Messages
20
Reaction score
6
Points
3
NullCash
21
As you can see there are plenty of formats and way where your logo can be displayed, and PrestaShop favicon option is far from enough. 98% of the stores i see, often don’t have even favicon or have the default one, but don’t forget that your logo and your PrestaShop favicon are important way for your customers to remember your store.

So lets get started

Time needed: 20 minutes.
First you need to check what PrestaShop icons your store already have.
  1. To do so, go to this address here and enter your PrestaShop address in the field
    favicon checker
  2. After you see your report, it will most probably tell you that beside the default favicon, you don’t have any other icons for your PrestaShop store.
  3. Create your store Logo image in square format (minimum size 300x300px) and when you are ready click here.
  4. Now click on the “Select your favicon image” button and wait for the generate process to complete.
    prestashop-generate-icons.jpg.webp
  5. On the next page you will see an preview of how your icons will be displayed in various scenarios, you can also make adjustments if needed or add more images as per specific OS and more. After you review all of it and make adjustments if need, click the “Generate your Favicons and HTML code” button.
    prestashop-generate-icons2.jpg.webp
  6. Wait for the process to finish generating the favicons and once its complete, click the “Favicon Packge” button to download the package. Also copy the code that is shown.
    prestashop-generate-icons3.jpg.webp
  7. Extract the files from the downloaded package archive and upload them to your PrestaShop root folder. It should look like this if you used Filezilla to connect to your FTP.
    filezilla-favicons-uploaded.jpg.webp
  8. Now to implement the code in your PrestaShop store, navigate to /themes/classic/templates/_partials/ folder in your PrestaShop folder and download “head.tpl” file.
    Note:
    If you are not using classic theme you should go in your current theme folder and get the head.tpl file from there.
    Note: This is for PrestaShop 1.7, for PrestaShop 1.6 the file is “header.tpl” in your theme folder, between <.head> <./head> tags
  9. Open and edit the head.tpl file with your code editor software or plain notepad. Do not use word or similar programs. Copy and paste the code that you previously copied from the page and paste it in the head tpl as shown on the image.
    prestashop-head-tpl-favicons.jpg.webp
  10. Save the file and re-upload it to your PrestaShop original location and replace it with the old one.

  11. IMPORTANT!!! Don’t forget to clear your PrestaShop cache and recompile templates in order to see the changes.
    If you don’t know how to do that, check our guide here.
  12. You can now go back here and run the check again to verify the results. That’s it, you are done.
 

d-shilko

Well-known member
Pro
Master
Diamond
Elite
Joined
Jun 10, 2021
Messages
2,495
Reaction score
1,422
Points
113
NullCash
6,092
As you can see there are plenty of formats and way where your logo can be displayed, and PrestaShop favicon option is far from enough. 98% of the stores i see, often don’t have even favicon or have the default one, but don’t forget that your logo and your PrestaShop favicon are important way for your customers to remember your store.

So lets get started

Time needed: 20 minutes.
First you need to check what PrestaShop icons your store already have.
  1. To do so, go to this address here and enter your PrestaShop address in the field
    favicon checker
  2. After you see your report, it will most probably tell you that beside the default favicon, you don’t have any other icons for your PrestaShop store.
  3. Create your store Logo image in square format (minimum size 300x300px) and when you are ready click here.
  4. Now click on the “Select your favicon image” button and wait for the generate process to complete.
    prestashop-generate-icons.jpg.webp
  5. On the next page you will see an preview of how your icons will be displayed in various scenarios, you can also make adjustments if needed or add more images as per specific OS and more. After you review all of it and make adjustments if need, click the “Generate your Favicons and HTML code” button.
    prestashop-generate-icons2.jpg.webp
  6. Wait for the process to finish generating the favicons and once its complete, click the “Favicon Packge” button to download the package. Also copy the code that is shown.
    prestashop-generate-icons3.jpg.webp
  7. Extract the files from the downloaded package archive and upload them to your PrestaShop root folder. It should look like this if you used Filezilla to connect to your FTP.
    filezilla-favicons-uploaded.jpg.webp
  8. Now to implement the code in your PrestaShop store, navigate to /themes/classic/templates/_partials/ folder in your PrestaShop folder and download “head.tpl” file.
    Note:
    If you are not using classic theme you should go in your current theme folder and get the head.tpl file from there.
    Note: This is for PrestaShop 1.7, for PrestaShop 1.6 the file is “header.tpl” in your theme folder, between <.head> <./head> tags
  9. Open and edit the head.tpl file with your code editor software or plain notepad. Do not use word or similar programs. Copy and paste the code that you previously copied from the page and paste it in the head tpl as shown on the image.
    prestashop-head-tpl-favicons.jpg.webp
  10. Save the file and re-upload it to your PrestaShop original location and replace it with the old one.

  11. IMPORTANT!!! Don’t forget to clear your PrestaShop cache and recompile templates in order to see the changes.
    If you don’t know how to do that, check our guide here.
  12. You can now go back here and run the check again to verify the results. That’s it, you are done.
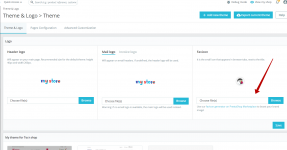
1633058132128.png
Just upload here ico file
 
Top